Cool Descending Ghost Bends – Lead Guitar String Bends
Emotion To Any Guitar Lick

EMAIL TO GET ACCESS
By submitting your info, you agree to send it to Tom Hess Music Corporation who will process and use it according to their privacy policy.
In this lead guitar article, I show you a very cool guitar soloing phrasing technique that few guitar players use in their guitar licks and solos.
I'm of course talking about…
Ghost bends.
Also known as:
Descending bends
Or pre-bends.
A ghost bend happens when you bend a note up (without picking it) and only sound the release of the note.
This makes your lead guitar licks very dramatic (and adds a ton of emotion to your guitar solos).
And after I show you how to do ghost bends, I'll give you more easy lead guitar soloing tips that help you sound more pro.
Emotion To Any Guitar Lick
EMAIL TO GET ACCESS
By submitting your info, you agree to send it to Tom Hess Music Corporation who will process and use it according to their privacy policy.
To begin…
Watch this lead guitar video showing you how to practice ghost bends on guitar:
Now that you know the basics, let's go deeper.
Here are 5 more lead guitar string bend tips that help you squeeze more emotion out of every note you play on guitar:
Ghost Bend Tip #1: Master The Basic Guitar String Bend Technique To Make Your String Bends Sound Better
You'll have a much easier time doing advanced ghost bends (and other types of advanced string bends) when you have great string bending technique to start with.
Here are proven tips for improving your guitar string bending technique:
- Wrap your thumb around the neck of the guitar to give yourself more leverage when you bend strings (and do ghost bends) in your guitar licks and guitar solos. The spot where your index finger connects to your hand becomes the pivot point by which your hand moves to do the bending motion.
- Move your elbow out from your body (a bit) to give yourself even more leverage and make string bends easier.
- Move the string by rotating your forearm (like turning a doorknob), not by extending the fingers. Bend the top 2 strings (B and high E) up towards the ceiling. Bend the bottom 3 strings (Low E, A and D) down towards the floor. You can bend the G string up 'or' down (but most of the time I prefer to bend it up towards the ceiling).
- Use smaller intervals to practice string bending and prepare your technique for doing ghost bends. "Smaller intervals" means bending only ½ step or a whole step (but not wider).
And to help with this, try the next lead guitar tip, which is:
- Tune your guitar down by half step or whole step. This makes it easier for your hand to practice the string bending motions without tearing up your calluses.
Question: "But Tom Hess, I heard that you should not wrap your thumb around the neck when playing lead guitar!"
Answer: It's totally ok to wrap the thumb around the neck of the guitar when doing string bends and vibrato. It should stay behind the neck when playing big stretches and advanced guitar licks.
Watch this video that explains the proper thumb position for your fretting hand. It will help you to understand where to position the thumb when you practice string bends and other lead guitar techniques.
Question: "But Tom Hess, I struggle to make my string bends in tune. Sometimes they are and sometimes they aren't. What should I do?"
Answer: Try this: play the note you intend to bend up to as a regular note. Get its sound into your ear. Then, do your string bend slowly and stop when the string reaches the target pitch. Keep practicing this way to build consistency of your lead guitar string bends.
Ghost Bend Tip #2: Combine Ghost Bends With Other Advanced Lead Guitar String Bends.
Most lead guitarists know traditional string bends (like whole steps and half steps). A few also know about ghost bends (like the ones I showed you in the video at the start of this article).
But check this out:
How many 2.5 step guitar string bends did you use in your last solo?
When was the last time you played a sliding chain of guitar string bends?
How often do you play half-ghosted guitar string bends?
Ok, I don't expect you to know these names, but...
...these techniques are advanced variations of basic guitar string bends.
Because they take a lot of control and finesse to play well.
Good news is:
Anyone can learn to play them – including you.
And when you do - every lick you play will drip with heart-piercing emotion.
Check out this advanced guitar string bends demonstration and I’ll teach you how:
Practicing these advanced lead guitar string bends becomes much easier when you use lighter strings (and/or lower tunings). But if you don't prefer to play on lighter strings or in lower tunings? Then work your way up to standard tuning and your normal string gauge when you get the hang of the string bend variations.
Another bonus idea (a fun string bending challenge):
Play an entire scale by using string bends.
Take the C major scale for example (C D E F G A B). Instead of playing the C note to begin the scale, bend from the B note up to C and hold out the bend for a second (with some vibrato).
Then, bend from C up to D (and hold that bent note out too, with some vibrato).
Next, bend from D up to E (in the same way).
Continue bending into each note of the scale one at a time. The goal is to make each string bend sound clean and in tune.
Ghost Bend Tip #3: Combine Ghost Bends With Cool Vibrato
Smooth and controlled vibrato makes your string bends (and ghost bends) sound much more expressive.
Fortunately, many of the lead guitar technique elements that go into making your vibrato sound good are identical to the ones that help your bending.
Watch this video that shows you the right way to practice and play vibrato in your guitar licks and solos:
And here are the most common vibrato mistakes to avoid (that make your guitar licks and solos sound amateur).
Mistake #1: Vibrato out of control. This means: you're changing the speed (and/or the width) of your vibrato erratically, while the note is sustaining. The key word is "erratically". It's ok to change the speed (and width) of the vibrato, as long as it's done deliberately and intentionally.
But there is a difference between doing that and speeding up or slowing down the vibrato with no control.

As a general rule: the faster the tempo of the song, the wider the vibrato ought to be. And the slower the tempo of the song, the narrower you should make the vibrato.
Fast and narrow vibrato makes your playing sound and feel out of control (even if you're feeling perfectly calm while playing). While slow and wide vibrato doesn't sound like vibrato at all. (It sounds like slow string bends.)
Mistake #2: Out-of-tune vibrato. This one can sound quite awful. A vibrato is out of tune when the string doesn't return all the way down to its original (unbent) pitch between the pulses of the bends. (The note then becomes sharp.)
Mistake #3: Out-of-time vibrato. This happens when your vibrato is not in sync with the rhythm of the song.
Mistake #4: Giving up on the note too early. Many guitar players stop trying to do vibrato after a few pulses on a note. This makes it almost impossible to develop full control over your vibrato and make it sound truly pro.
The solution?
Keep the vibrato going even when the note gets weaker and you hear some fret noise (of the string grinding against the frets).
This gives you enough time to assess whether your vibrato is in time and in tune, then adjust it so it sounds better.
Plus, this lets you bring a dying note back to life and increase your lead guitar sustain. Watch this video where I show you how to do this:
Ghost Bend Tip #4: Control Excess String Noise
String noise makes your ghost bends (and the rest of your lead guitar playing) sound sloppy and amateur.
What causes string noise in guitar licks and guitar solos?
3 things:
1. Noise from the thicker (lower in pitch) strings.
2. Noise from the thinner (higher in pitch) strings.
(Technically, there is also #3, which happens from notes bleeding together. But this cause of string noise doesn't apply to ghost bends or string bends in general.)
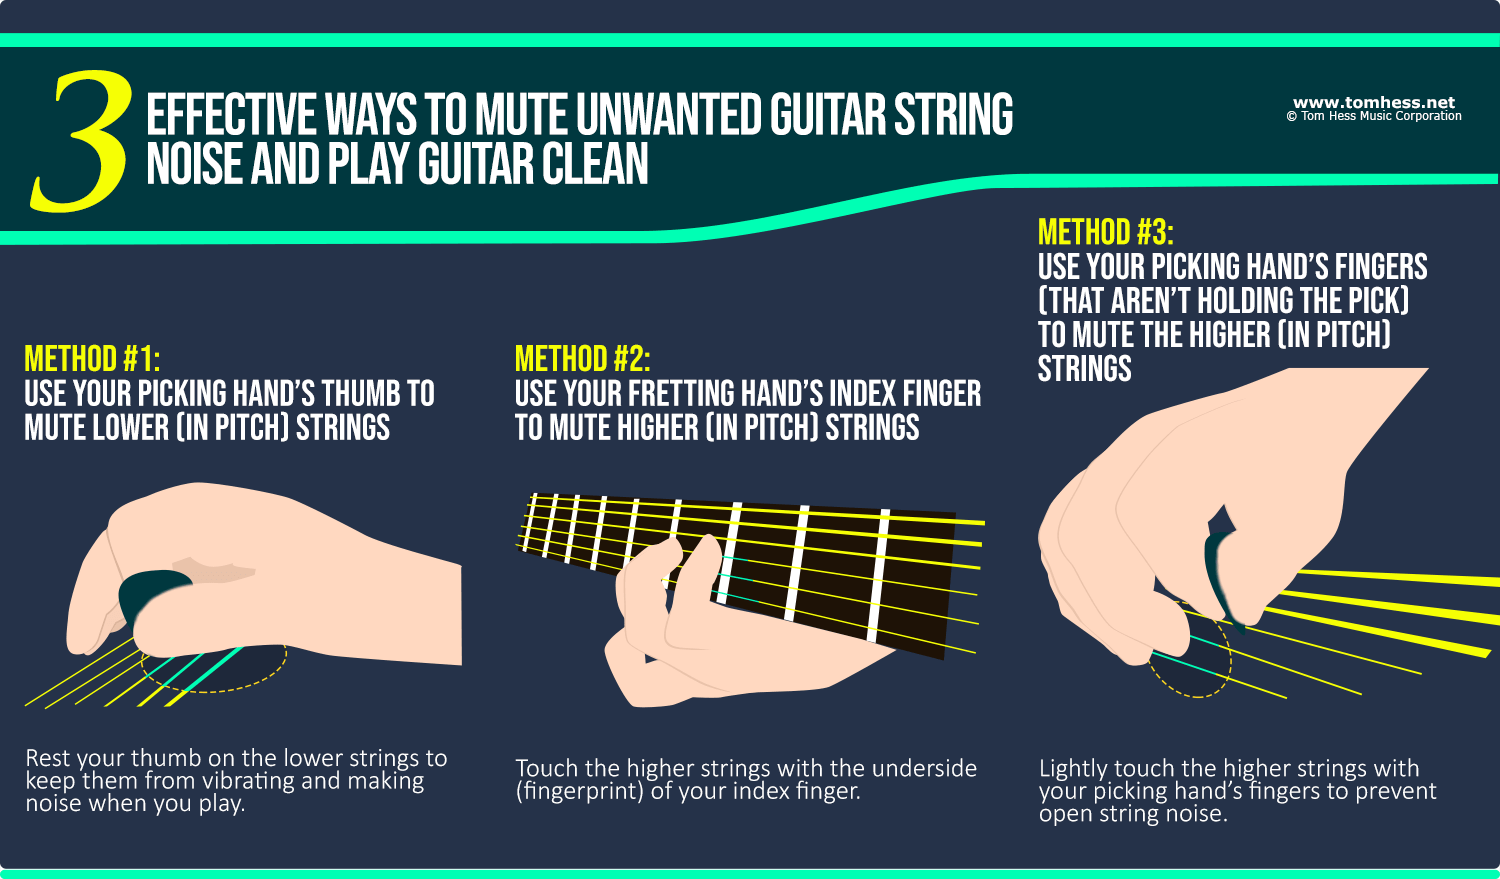
How do you mute noise from the higher and lower strings in your guitar licks?
When you want to mute noise from the lower (thicker) strings, use thumb muting. Thumb muting – just like the name implies – means you rest your picking hand's thumb on the thicker strings to keep them from making noise.
To do thumb muting correctly, you'll need to hold your guitar pick the way I show in this video:
To mute the higher in pitch strings, use your index finger (of your fretting hand) to lightly touch the higher strings and keep them from ringing out.
Question: "Tom Hess, what if I'm used to muting string noise with the palm of my picking hand instead of the thumb? Can I continue to do that instead?
Answer: You can if you want, but I don't recommend it. Muting with the palm is less reliable than thumb muting. The palm is closer to the bridge (where it is less able to mute the lower strings than the thumb).
On top of this, muting with the palm puts the pick's resting position far away from the strings (making your picking less efficient).
Ghost Bend Tip #5: Integrate String Bends With Slides
When you combine ghost bends (and other string bend variations) with cool lead guitar slides, your guitar licks and solos will sound way more pro.
And contrary to what most guitarists think…
There are many different guitar slide variations.
Here are some of them:
- ascending guitar phrasing slides. As you can guess from the name, you slide into a higher note from a lower pitch.
- descending guitar phrasing slides. This is simply the reverse of the ascending guitar phrasing slides.
- backslides. Many lead guitarists confuse backslides with descending guitar phrasing slides. They are not.
A backslide guitar phrasing ornament consists of 3 parts: First, you play the note itself. Second, you slide either up or down (in pitch) away from the note you are playing. Then, you quickly slide back to the original note (either up or down).
That said, even though I described a backslide as 3 ‘events’, it is still a lead guitar phrasing ornament of only ‘one’ note.
Watch this video to see how to do backslides the right way in your guitar licks and guitar solos:
- super slides. This lead guitar phrasing ornament is about sliding up 1 octave or more. These lead guitar phrasing slide ornaments can be either ascending in pitch or descending in pitch.
- re-articulation guitar phrasing slides. “Re-articulation” is a fancy guitar phrasing term that means: “play something again”. To play a re-articulation guitar phrasing slide, simply play a note and then immediately slide into that same note (from above or below in pitch).
Now that you have more mastery over lead guitar string bends, I want to show you how squeeze more fire and emotion out of any guitar lick (even if you can't play guitar fast yet). I show you how in my free eGuide: The Secret To Adding Fire And Emotion To Any Guitar Lick (Even If You Can’t Play Guitar Fast Yet). Download it today and discover the lead guitar secrets most guitarists will never know.


Transform your guitar playing with proven online rock guitar classes.
